参考:原文
基本配置 随机种子 在硬件设备(CPU、GPU)不同时,完全的可复现性无法保证,即使随机种子相同。但是,在同一个设备上,应该保证可复现性。具体做法是,在程序开始的时候固定torch的随机种子,同时也把numpy的随机种子固定。
1
2
3
4
5
6
7
8
9
10
11
import randomimport torchimport numpy as nptorch.backends.cudnn.deterministic = True torch.backends.cudnn.benchmark = False random.seed(hash ("setting random seeds" ) % 2 **32 - 1 ) np.random.seed(hash ("improves reproducibility" ) % 2 **32 - 1 ) torch.manual_seed(hash ("by removing stochasticity" ) % 2 **32 - 1 ) torch.cuda.manual_seed_all(hash ("so runs are repeatable" ) % 2 **32 - 1 )
查询cuda/cudnn/GPU型号版本 1 2 3 4 5 6 7 8 import torchimport torch.nn as nnimport torchvisionprint (torch.__version__)print (torch.version.cuda)print (torch.backends.cudnn.version())print (torch.cuda.get_device_name(0 ))
显卡设置 一张显卡:
1 device = torch.device('cuda' if torch.cuda.is_available() else 'cpu' )
多张显卡:
1 2 import osos.environ['CUDA_VISIBLE_DEVICES' ] = '0,1,2,3'
清除显存:
1 torch.cuda.empty_cache()
也可以使用在命令行重置GPU的指令:
1 nvidia-smi --gpu-reset -i [gpu_id]
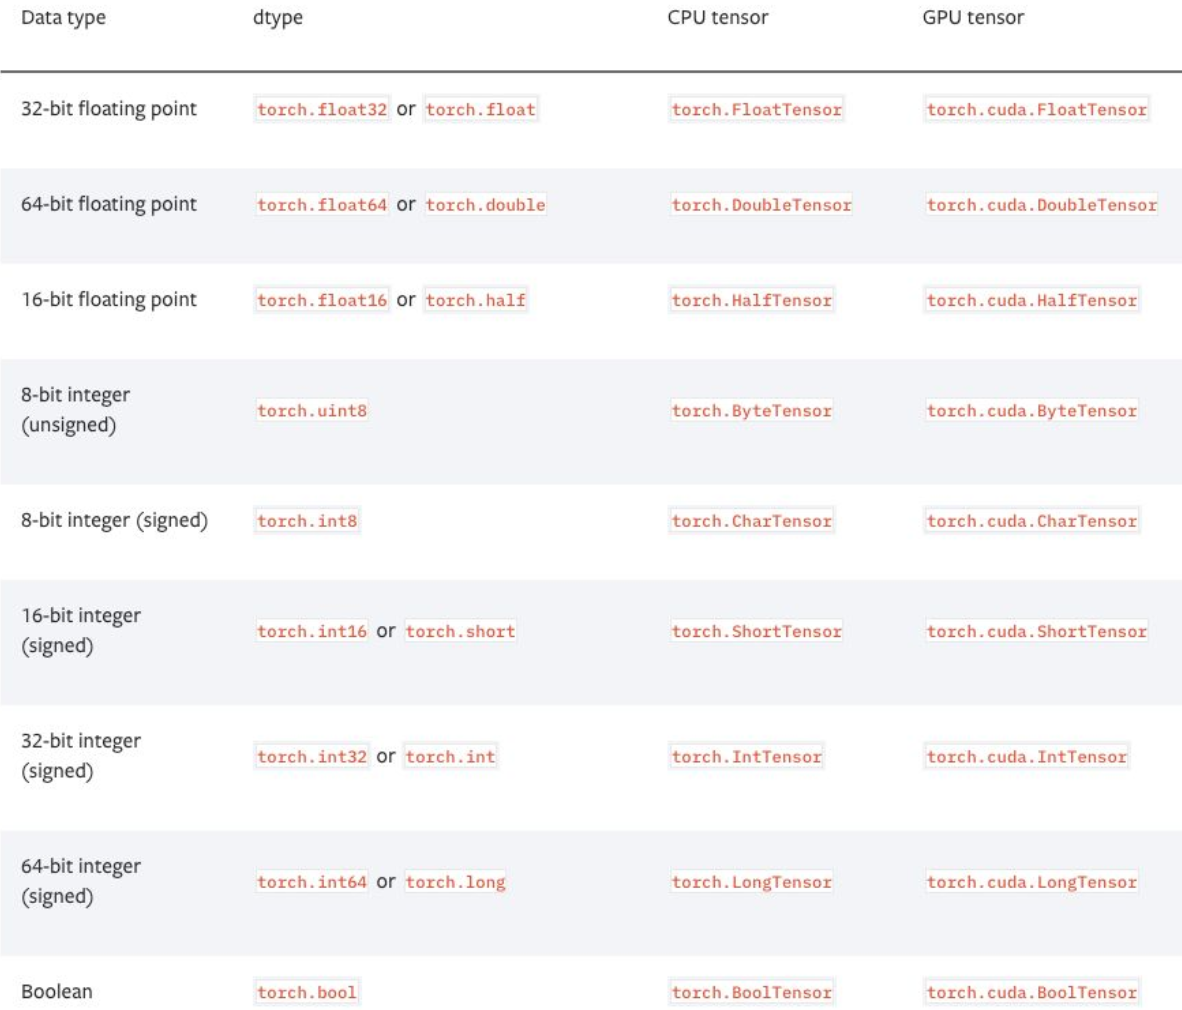
张量处理 张量的数据类型 PyTorch有9种CPU张量类型和9种GPU张量类型。
张量基本信息: 1 2 3 4 tensor = torch.randn(3 , 4 , 5 ) print (tensor.type ())print (tensor.size())print (tensor.dim())
数据类型转换: 1 2 3 4 5 6 7 import torcha = torch.randint(3 , (3 , 4 )) a = a.cuda() a = a.cpu() a = a.float () a = a.long()
torch.Tensor和np.ndarray转换 除了CharTensor,其他所有CPU上的张量都支持转换为numpy格式然后再转换回来。
1 2 3 ndarray = tensor.cpu().numpy() tensor = torch.from_numpy(ndarray).float () tensor = torch.from_numpy(ndarray.copy()).float ()
torch.Tensor和PIL.Image的转换 pytorch中的张量默认采用[N, C, H, W]的顺序,并且数据范围在[0,1],需要进行转置和规范化。
使用PIL读取的图像,使用np.array()转换了之后形状为[H, W, C]
使用cv读取的图像,形状为[H, W, C].
torch.Tensor->PIL.Image
1 2 image = PIL.Image.fromarray(torch.clamp(tensor*255 , min =0 , max =255 ).byte().permute(1 ,2 ,0 ).cpu().numpy()) image = torchvision.transforms.functional.to_pil_image(tensor)
PIL.Image->torch.Tensor
1 2 3 path = r'./figure.jpg' tensor = torch.from_numpy(np.asarray(PIL.Image.open (path))).permute(2 ,0 ,1 ).float () / 255 tensor = torchvision.transforms.functional.to_tensor(PIL.Image.open (path))
np.ndarray与PIL.Image的转换 1 2 3 image = PIL.Image.fromarray(ndarray.astype(np.uint8)) ndarray = np.asarray(PIL.Image.open (path))
从只包含一个元素的张量中取值 1 value = torch.rand(1 ).item()
张量形变 相比torch.view,torch.reshape可以自动处理输入张量不连续的情况。
1 2 3 tensor = torch.rand(2 ,3 ,4 ) shape = (6 , 4 ) tensor = torch.reshape(tensor, shape)
打乱顺序 1 tensor = tensor[torch.randperm(tensor.size(0 ))]
水平翻转 1 2 3 tensor = tensor[:,:,:,torch.arange(tensor.size(3 ) - 1 , -1 , -1 ).long()]
复制张量 1 2 3 4 tensor.clone() tensor.detach() tensor.detach.clone()()
张量拼接 1 2 3 4 5 6 7 ''' 注意torch.cat和torch.stack的区别在于torch.cat沿着给定的维度拼接, 而torch.stack会新增一维。例如当参数是3个10x5的张量,torch.cat的结果是30x5的张量, 而torch.stack的结果是3x10x5的张量。 ''' tensor = torch.cat(list_of_tensors, dim=0 ) tensor = torch.stack(list_of_tensors, dim=0 )
将整数标签转换为one-hot编码 1 2 3 4 5 6 tensor = torch.tensor([0 , 2 , 1 , 3 ]) N = tensor.size(0 ) num_classes = 4 one_hot = torch.zeros(N, num_classes).long() one_hot.scatter_(dim=1 , index=torch.unsqueeze(tensor, dim=1 ), src=torch.ones(N, num_classes).long())
得到非零元素 1 2 3 4 torch.nonzero(tensor) torch.nonzero(tensor==0 ) torch.nonzero(tensor).size(0 ) torch.nonzero(tensor == 0 ).size(0 )
判断两个张量相等 1 2 torch.allclose(tensor1, tensor2) torch.equal(tensor1, tensor2)
张量扩张 1 2 3 tensor = torch.rand(64 ,512 ) torch.reshape(tensor, (64 , 512 , 1 , 1 )).expand(64 , 512 , 7 , 7 )
相乘 matrix * matrix:
1 2 3 4 5 6 tensor1 = torch.tensor([[1 , 2 , 3 ], [1 , 2 , 3 ]]) tensor2 = torch.tensor([[2 ], [3 ], [4 ]]) print (torch.mm(tensor1, tensor2)) res = tensor1 @ tensor2
matrix * vector:
1 2 3 4 5 6 tensor1 = torch.tensor([[1 , 2 , 3 ], [1 , 2 , 3 ]]) tensor2 = torch.tensor([2 , 3 , 4 ]) torch.mv(tensor1, tensor2) tensor1 @ tensor2
Element-wise multiplication:
1 2 3 4 tensor1 = torch.tensor([[1 , 2 , 3 ], [1 , 2 , 3 ]]) tensor2 = torch.tensor([[2 , 3 , 4 ], [2 , 3 , 4 ]]) res = tensor1 * tensor2 print (res.size())
Batch matrix multiplication: (bm n) (b np) -> (b m*p)
1 result = torch.bmm(tensor1, tensor2)
计算两个数据之间的两两欧氏距离 1 2 3 4 5 X1 = torch.tensor([[1 , 2 , 3 ], [1 , 2 , 3 ]]).float () X2 = torch.tensor([[2 , 3 , 4 ], [2 , 3 , 4 ]]).float () dist = torch.sqrt(torch.sum ((X1[:,None ,:] - X2) ** 2 , dim=2 )) print (dist)
增加维度、减少维度 增加维度:
1 2 3 4 5 6 7 8 9 10 11 X1 = torch.tensor([[1 , 2 , 3 ], [1 , 2 , 3 ]]).float () print (X1.unsqueeze(0 ).size()) print (X1.unsqueeze(1 ).size()) print (X1.unsqueeze(2 ).size()) X1 = torch.tensor([[1 , 2 , 3 ], [1 , 2 , 3 ]]).float () print (X1[None , :, :].size()) print (X1[:, None , :].size()) print (X1[:, :, None ].size())
减少维度:
1 2 X1 = torch.randn([1 , 2 , 3 ]) X1.squeeze(0 ).size()